My biggest breakthrough in AI image generation happened at 2 AM. I was trying to create a portrait for my portfolio, and after 50 failed attempts, I added “golden hour light from the left” – just as an experiment. The result was so good I almost woke up my family.
That night taught me that lighting isn’t just a detail – it’s everything. Since then, I’ve studied how different lighting styles affect mood, realism, and composition. I’ve tested hundreds of variations and documented what works.
In this guide, I’ll share everything I’ve learned about lighting styles for AI images – so you can skip the 50 failed attempts and get straight to the good results.
For a complete foundation in AI image generation, including how prompts work at a basic level, check out our comprehensive AI Image Generation Guide .
Why Lighting Matters in AI Images
Lighting is the single most important factor in realistic AI images. It affects:
- Mood – warm light feels cozy, cold light feels distant
- Depth – shadows create dimension
- Realism – natural lighting looks like photographs
- Focus – light directs where the viewer looks
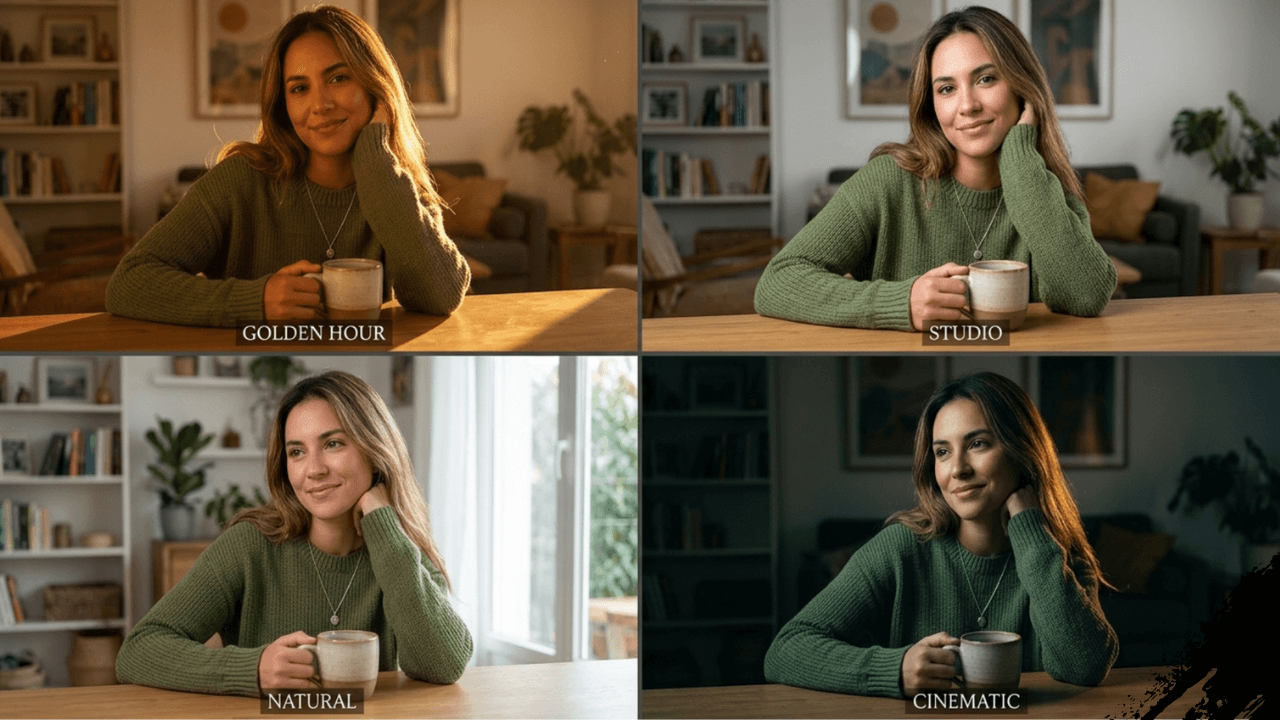
I’ve tested this extensively. Take the exact same subject and change only the lighting – the results look like completely different images.
Essential Lighting Styles Explained
1. Golden Hour Light
The hour after sunrise and before sunset. Warm, soft, directional.
Best For: Portraits, landscapes, romantic scenes, outdoor photography
How to Use in Prompts:
- “golden hour light from the left”
- “warm sunset glow”
- “soft golden backlight”
This is my favorite lighting style. It’s flattering for almost everything and adds instant mood.
2. Studio Lighting
Controlled, professional lighting with soft shadows.
Best For: Product photography, portraits, fashion shoots
How to Use in Prompts:
- “soft studio lighting with even illumination”
- “professional studio setup with soft shadows”
- “directional studio light from above”
For product images, studio lighting is essential. It makes products look clean and professional.
3. Natural Daylight
The sun at different times of day. Changes with time and weather.
Best For: Outdoor scenes, lifestyle photography, casual portraits
How to Use in Prompts:
- “soft morning light”
- “bright midday sun with harsh shadows”
- “overcast natural light, no harsh shadows”
Overcast light is surprisingly good for portraits – it acts like nature’s softbox.
4. Cinematic Lighting
Dramatic, moody lighting inspired by films.
Best For: Storytelling images, dramatic portraits, concept art
How to Use in Prompts:
- “cinematic lighting with dramatic shadows”
- “film noir style with high contrast”
- “moody backlight with rim light”
This style adds drama and emotion. Perfect when you want your image to tell a story.
5. Backlight
Light coming from behind the subject.
Best For: Silhouettes, rim light effects, dramatic separation
How to Use in Prompts:
- “backlight creating rim light around subject”
- “sun behind subject with lens flare”
- “silhouette against bright background”
Backlight creates beautiful separation between subject and background.
6. Soft Light
Diffused, gentle lighting with minimal shadows.
Best For: Portraits, beauty shots, feminine subjects
How to Use in Prompts:
- “soft diffused light”
- “window light with soft curtains”
- “cloudy day soft lighting”
Soft light is forgiving and flattering. It hides imperfections and creates a dreamy feel.
7. Hard Light
Direct, harsh lighting with strong shadows.
Best For: Dramatic portraits, texture emphasis, moody scenes
How to Use in Prompts:
- “harsh direct sunlight with strong shadows”
- “hard studio light with sharp shadows”
- “high contrast lighting”
Hard light is bold and dramatic. Use it when you want to make a statement.
For more on combining lighting with camera techniques, our guide on [Camera Terms Explained for AI Image Generation] covers complementary concepts.
Lighting Style Comparison Table
| Style | Mood | Best For | Difficulty |
|---|---|---|---|
| Golden Hour | Warm, romantic | Portraits, landscapes | Easy |
| Studio | Clean, professional | Products, fashion | Medium |
| Natural | Authentic, real | Lifestyle | Easy |
| Cinematic | Dramatic, moody | Art, storytelling | Medium |
| Backlight | Artistic, separated | Dramatic portraits | Hard |
| Soft Light | Gentle, dreamy | Beauty, feminine | Easy |
| Hard Light | Bold, edgy | Dramatic, texture | Medium |
Practical Examples
Example 1: Same Subject, Different Lighting
Subject: A young woman sitting on a chair
Golden Hour:
“a young woman sitting on a chair, golden hour light from the right, warm glow on her face, soft shadows, romantic mood”
Studio:
“a young woman sitting on a chair, professional studio lighting with soft shadows, clean white background, fashion photography style”
Cinematic:
“a young woman sitting on a chair, cinematic lighting with dramatic shadows, moody atmosphere, film noir style”
I generated all three versions for a client project. The client couldn’t believe they were the same subject – the lighting completely transformed the mood.
Example 2: Product Photography
Bad:
“a watch on a table”
Good with Studio:
“a luxury watch on a marble table, soft studio lighting from multiple angles, clean reflections, ultra-realistic detail, 8K quality”
Good with Natural:
“a luxury watch on a wooden table, soft morning light from a window, natural shadows, warm tones, lifestyle photography style”
The studio version looks like a catalog. The natural version looks like a lifestyle blog. Both work for different purposes.
Common Lighting Mistakes
1. No Lighting Instructions
❌ Wrong: “a portrait”
✅ Right: “a portrait with soft studio lighting”
2. Conflicting Lighting Styles
❌ Wrong: “golden hour with studio lighting” (they conflict)
✅ Right: Pick one style and stick to it
3. Ignoring Light Direction
Light without direction creates flat images. Always specify where light comes from.
4. Forgetting Shadows
Real light creates shadows. If your image has no shadows, it will look fake.
Our guide on [Common Beginner Mistakes in AI Image Generation] covers lighting mistakes in detail.
Lighting Cheat Sheet
| Desired Mood | Use This Lighting |
|---|---|
| Warm & Romantic | Golden hour, warm backlight |
| Clean & Professional | Studio lighting, soft light |
| Authentic & Real | Natural daylight, overcast |
| Dramatic & Moody | Cinematic, hard light |
| Artistic & Creative | Backlight, colored light |
How to Combine Lighting with Other Elements
Lighting works best with:
- Camera Terms – “shot on 85mm with golden hour light”
- Environment – “urban street at night with neon lighting”
- Quality – “ultra-realistic lighting, 8K detail”
For more on camera terms, our guide on [Camera Terms Explained for AI Image Generation] has excellent examples.
Frequently Asked Questions
Which lighting style is easiest for beginners?
Golden hour and natural daylight are the most forgiving. Start there.Can I use multiple lighting styles in one prompt?
Not really. Pick one dominant style. Multiple styles confuse the AI.Does lighting work the same in all AI tools?
The concepts are the same, but tools interpret them slightly differently. Our guide [Midjourney vs Leonardo vs Stable Diffusion] explains the differences.Which tool handles lighting best?
For realistic lighting, [Leonardo AI for Realistic Images] is excellent. For dramatic, cinematic lighting, Midjourney shines.How do I learn more about lighting?
Practice and observation. Look at photographs and notice how light behaves.
Conclusion
Lighting transformed my AI images from amateur to professional. That 2 AM breakthrough taught me that lighting isn’t just a detail – it’s the foundation of realism.
Now, before I write any prompt, I decide on the lighting first. Subject and composition come second. This simple workflow has saved me countless hours of trial and error.